Implement a BPMN Parallel Gateway in Camunda

The article contains a step-by-step guide on how to implement a BPMN Parallel Gateway in Camunda making use of a Spring Boot Application.
- What is a Parallel Gateway
- Getting Started Guide
- Compile & Run The Example
- View Camunda Admin Console
- View the H2 Console
- Example Code
- Finally
The article contains a step-by-step guide on how to implement a BPMN Parallel Gateway in Camunda making use of a Spring Boot Application. Camunda BPM is an open-source workflow and decision automation platform.
What is a Parallel Gateway
“A Parallel Gateway creates parallel paths without checking any conditions; each outgoing Sequence Flow receives a token upon execution of this Gateway. For incoming flows, the Parallel Gateway will wait for all incoming flows before triggering the flow through its outgoing Sequence Flows.” BPMN Parallel Gateway
Getting Started Guide
The following is a step-by-step guide on how to implement a BPMN Parallel Gateway in Camunda making use of a Spring Boot Application.
Step 1: Create a Spring Boot Application
Create a spring boot application containing the Camunda BPM Engine. Use the Camunda BPM Initializr website to assist you in generating a Spring Boot application. Open the following URL in a browser and complete the form to bootstrap your application.
Fore a more detailed approach on how to create a spring boot application containing the Camunda BPM Engine, use the following link:
Step 2: Model the Process
Use Camunda Modeller to model the process. The process model is composed of five tasks and two parallel gateways:
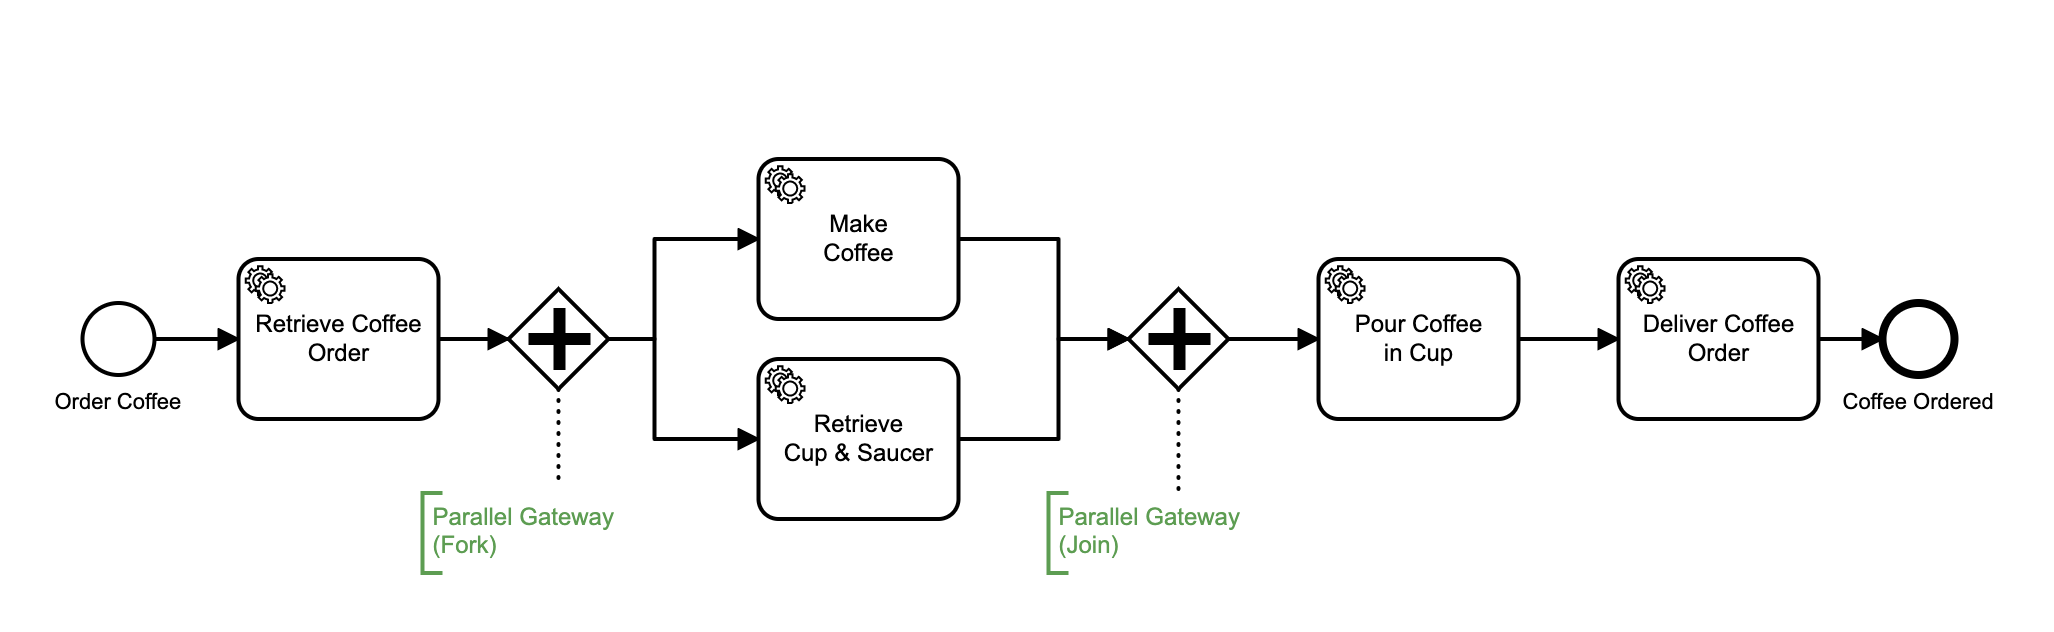 Example of a parallel gateway
- Retrieve Coffee Order: Is a
Service Tasklinked to a Delegate Expressions with the name${logger}. - Make Coffee: Is a
Service Tasklinked to a Delegate Expressions with the name${logger}. - Retrieve Cup & Saucer: Is a
Service Tasklinked to a Delegate Expressions with the name${logger}. - Pour Coffee in Cup: Is a
Service Tasklinked to a Delegate Expressions with the name${logger}. - Deliver Coffee Order:Is a
Service Tasklinked to a Delegate Expressions with the name${logger}.
Step 3: Create a Java Delegate
Implement the org.camunda.bpm.engine.delegate.JavaDelegate interface:
@Component("logger")
public class ConsoleLoggerDelegate implements JavaDelegate {

    private final Logger LOGGER = LoggerFactory.getLogger(ConsoleLoggerDelegate.class.getName());

    public void execute(DelegateExecution execution) throws Exception {
        String activityId = execution.getCurrentActivityId();

        if ("retrieve-coffee-order".equals(activityId)) {
            LOGGER.info("Order Coffee Process: Retrieve Coffee Order");

        } else if ("make-coffee".equals(activityId)) {
            LOGGER.info("Order Coffee Process: Make Coffee");

        } else if ("retrieve-cup-saucer".equals(activityId)) {
            LOGGER.info("Order Coffee Process: Retrieve Cup & Saucer");

        } else if ("pour-coffee-in-cup".equals(activityId)) {
            LOGGER.info("Order Coffee Process: Pour Coffee in Cup");

        } else if ("deliver-coffee-order".equals(activityId)) {
            LOGGER.info("Order Coffee Process: Deliver Coffee Order");

        } else {
            LOGGER.info("Something went wrong !!!!");
        }
    }
}
Step 4: Reference the JavaDelegate from BPMN
The JavaDelegate can be referenced using the delegateExpression attribute from the process Engine namespace:
<bpmn:serviceTask id="retrieve-coffee-order"
name="Retrieve Coffee Order" camunda:delegateExpression="${logger}">
...
<bpmn:serviceTask id="deliver-coffee-order"
name="Deliver Coffee Order" camunda:delegateExpression="${logger}">
...
<bpmn:serviceTask id="pour-coffee-in-cup"
name="Pour Coffee in Cup" camunda:delegateExpression="${logger}">
...
<bpmn:serviceTask id="retrieve-cup-saucer"
name="Retrieve Cup & Saucer" camunda:delegateExpression="${logger}">
...
<bpmn:serviceTask id="make-coffee"
name="Make Coffee" camunda:delegateExpression="${logger}">
Configure the service task using the properties panel wihtin the Camunda Modeler.
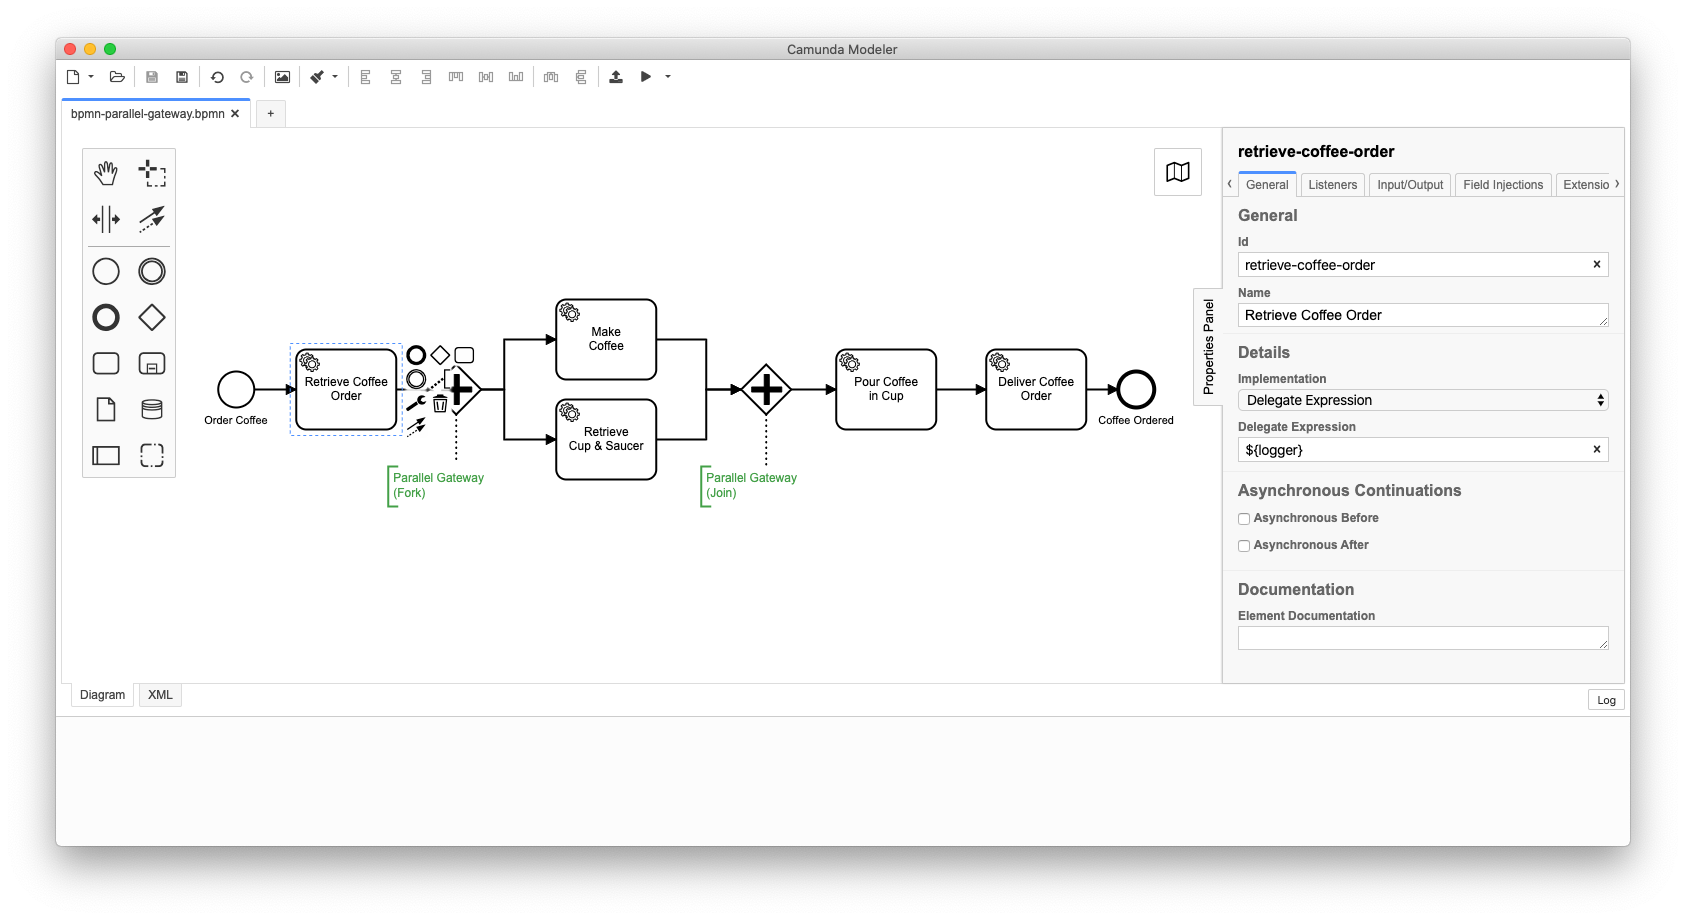 Camunda Modeller: Service Task Properties
Step 5: View the Spring Boot Application class
The Spring Boot application is implemented by a class called BasicParallelGatewayApplication. The class contains the @SpringBootApplication annotation that enables the spring boot auto configuration mechanism, enables the component scan on the packages and allow to register extra beans in the context.
@SpringBootApplication
public class BasicParallelGatewayApplication {

  public static void main(String[] args) {
    SpringApplication.run(BasicParallelGatewayApplication.class);
  }
}
Step 6: Configure the Camunda Spring Boot Application
The properties and configuration of the Spring Boot Application can be found in the application.yaml file within the src/main/resources folder. To startup your Camunda BPM Spring Boot application, you need to set some properties to allows you access.
The properties to configure your admin-user are listed below:
spring.datasource.url: jdbc:h2:mem:camunda-h2-database;DB_CLOSE_DELAY=-1;DB_CLOSE_ON_EXIT=FALSE

camunda.bpm.admin-user:
id: demo
password: demo

spring.h2.console:
enabled: true
path: /h2-console
Compile & Run The Example
1. Compile the application
Use the following command to compile the Spring Boot application making use of maven:
$ mvn clean install
2. Run the application
After you have successfully built the Camunda BPM Spring Boot application, the compiled artifact can be found in the target directory. Use the following command to start the Camunda BPM Spring Boot Application.
$ mvn spring-boot:run
3. Execute the example
After the application has started, run the following command in another terminal:
Run the command: Start Process Instance
The following command instantiates a new instance of the order-coffee process.
$ ./start_process_scenario_01.sh
The script performs the following commands:
curl --location --request POST 'http://localhost:8080/engine-rest/process-definition/key/order-coffee/start' --header 'Content-Type: application/json'
The following is the output to the console after running the above command.
 Log Statements on Console
View Camunda Admin Console
To view the Camunda Admin Console, type the following url in your browser while the application is running. You will be prompted with the login screen.
After you have typed the above URL in a browser while the application is running, you will be prompted with the login screen. Type the Username and Password you set within the application properties file.
View the H2 Console
To view the H2 Console, type the following url in your browser while the application is running. You will be prompted with the login screen.
After you have typed the above URL in a browser while the application is running, you will be prompted with the login screen. Press the connect button since there is no password specified.
Example Code
The source code used in this example can be found on Github.
Finally
Congratulations !!! You have successfully implemented a BPMN Parallel Gateway in Camunda making use of a Spring Boot Application.